


Introduction
After years of experience in influencer partnerships as a marketing professional in the beauty industry, I've learned a valuable lesson in selecting the ideal YouTube or TikTok influencer for a brand. (Yes, I’m a marketing professional turned software engineer 😉) The most successful collaborations tend to happen organically with influencers who are already genuine enthusiasts of your products or brand. For example, if you're promoting brand “A”, you might spot influencers who've mentioned “A” without any prior contact. When you do reach out, they're usually quite receptive to working together.
However, tracking down these influencers can be a bit challenging, especially when your brand isn't explicitly mentioned in video titles or descriptions. It's been my own pain point as well. For instance, if a YouTuber features your product in a video like "Top 10 Must-Have Products for Winter" without naming your brand, a typical keyword search on YouTube won't find it.
That's where the Who Talked About Us with Twelve Labs API can be a game-changer. Unlike regular YouTube or TikTok searches, it enables deep contextual video searches. Instead of relying on titles or descriptions, the API extracts various elements from videos, such as movements, objects, people, sounds, text on screen, and speech. By simply inputting a keyword or specific descriptions, like "using MAC gold highlighter," you can uncover videos and channels discussing your brand or products with the exact moments when these references pop up.
This allows you to create a list of influencers to reach out to, along with details about the products they've mentioned and the context. This empowers you with valuable insights about these potential influencers, enabling you to engage with them more effectively and establish meaningful connections.
Now, let's take a step-by-step journey into using the Twelve Labs API to create an app that leverages its power!
Prerequisites
- Before diving into the world of Twelve Labs API, you should start by signing up and generating your API key. Visit the Twelve Labs Playground, sign up, and generate your API key. Upon signing up, you'll receive complimentary credits which allow you to index up to 10 hours of video content!
- The repository containing all the files for this app is available on Github.
- This app was built with JavaScript, Node, React, and React Query. It will be helpful if you're already familiar with these technologies, but don't worry if you're not. The most important takeaway from this post will be to learn about the Twelve Labs API and how this app utilizes it.
1 - Design components
This app has been built using React, and React is all about breaking things down into reusable components. So I started out by designing the components and of course, I had to revise it multiple times.
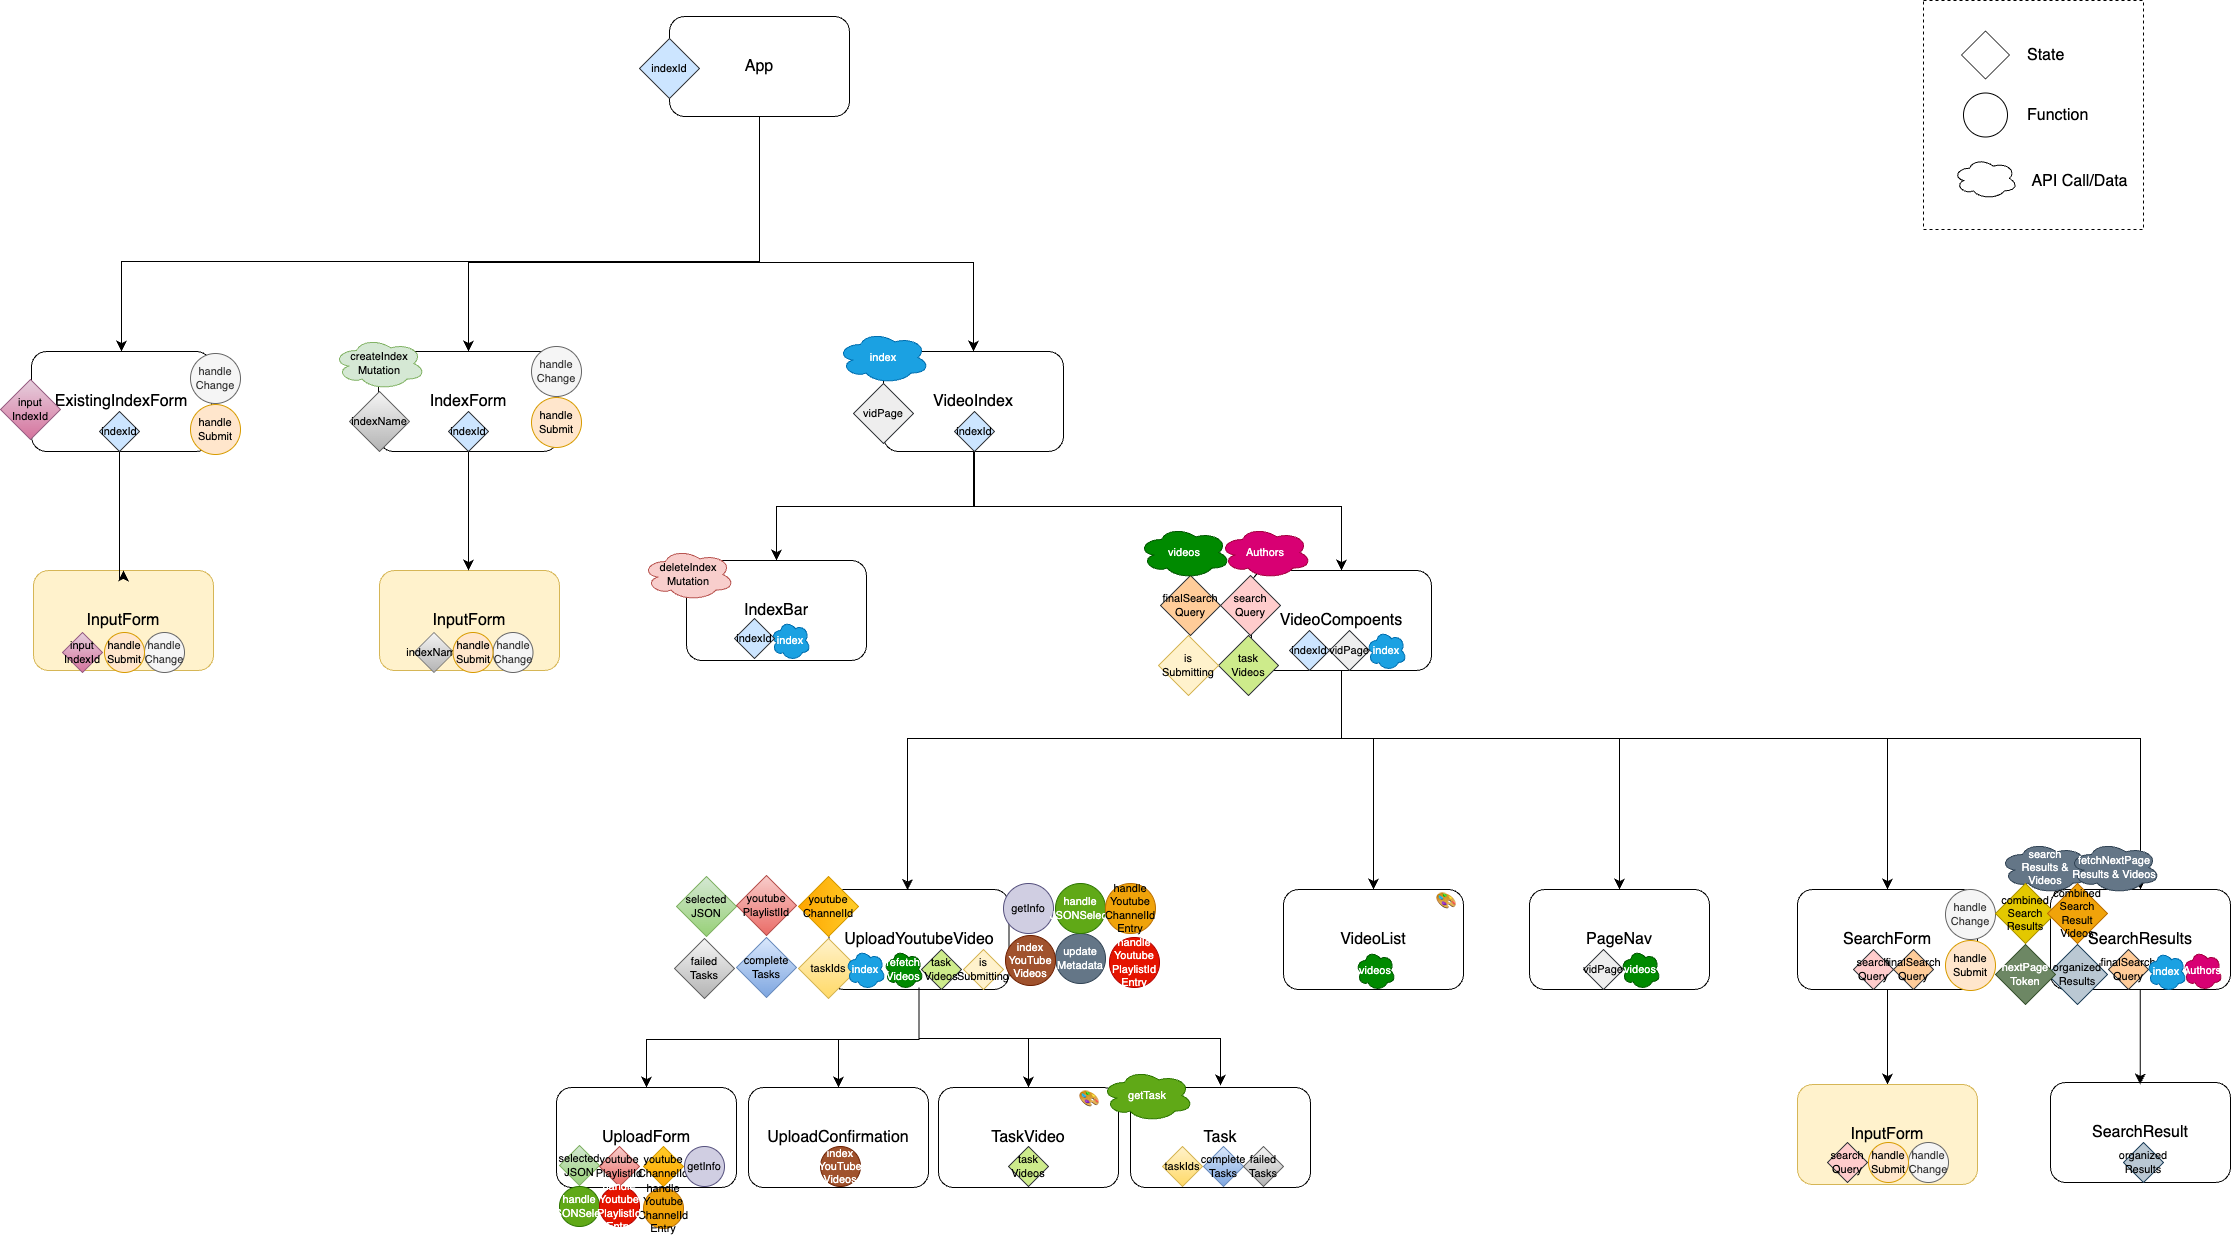
At a high level, the app consists of ExistingIndexForm, IndexForm, and VideoIndex. IndexForm is a simple form where a user can create a new index. ExistingIndexForm is another simple form where a user can submit an id of the index that he/she has already created before with this app. VideoIndex is where the call getting details of an index is made and where VideoComponents lives.
VideoComponents consists of all the components related to videos. UploadYoutubeVideo component enables video downloading/indexing, and shows the status of each video task. VideoList simply renders the videos of an index, along with PageNav to fetch and show them by 12 in each page. SearchForm is a component that handles video search where user input (search query) is taken and passed into the search API call. SearchResults calls an api for the search results and videos then organizes them by each influencer. SearchResult then shows each search result in a user-friendly way.
2 - Build server and API hooks
Server.js and apiHooks.js are the files that manage all the api calls from Twelve Labs API and other libraries such as ytdl-core. Server.js is where all the endpoints to call the Twelve Labs API and other API calls live. apiHooks.js is a set of custom React Query hooks for managing state, cache, and fetching data. As the core function of the server, well, in fact, the entire app, is the video search using Twelve Labs API, we’ll take a closer look at how to use it.
4 steps in using Twelve Labs API
First step is to create an index for your videos; then, you upload videos to this index. You will then update video metadata to add YouTube channel and url to each video (this step is specific for this app and is generally optional). Finally, you're ready to dive into video searching. In this app, I've organized all API calls (Twelve Labs and others) and the video upload related functions in the server.js file.
Set-ups
Create a .env file in the root directory and update the values as needed. You can simply copy-paste the below and customize the values.
.env
- REACT_APP_API_URL: This app supports v1.1
- REACT_APP_API_KEY: Store the API Key that you generated in the previous step
- REACT_APP_SERVER_URL: It could be something like "http://localhost"
- REACT_APP_PORT_NUMBER: Set a port number you want to use (e.g., 4001)
To access environment variable values in the files where you need them, you can utilize process.env. For instance, in your server.js file, you can access the API_URL and store it using process.env.REACT_APP_APP_URL. The following example illustrates how to achieve this.
Step 1. Create an index
An index is like a video library where you can upload, index, and search your videos. You can create your own index by date, theme, or YouTube channel. To create an index, you simply set the method as 'POST' and the endpoint as ‘https://api.twelvelabs.io/v1.1/indexes’, add headers, and provide the required data like engine_id, index_options, and index_name. For index_options, you can choose the subset of the four options. For this app, all four options have been included.
💡Check out the API reference for details in creating an index
Step 2. Upload videos by Youtube urls
This app supports uploading YouTube videos in bulk via channel IDs, playlist IDs, or a JSON file with an array of url objects that looks like below.
example.json
💡Uploading videos by Youtube urls is now available in Twelve Labs API v1.2. As this app is in v1.1, we are manually implementing it by leveraging ytdl-core, a library that enables downloading videos from YouTube.
So the process is to download a video from a given Youtube url and submit to Twelve Labs API which will index the video. This has been implemented in server.js, endpoint “/download”. It starts by extracting video data and indexing info from the request's body. Then it downloads videos in chunks, sanitizes their titles for safe filenames, and submits them for indexing. After all videos are downloaded and indexed, the server responds with task ids and index ids. Let’s break down each step and get a closer look.
1 - Extract information from the request
The first step is to extract video data and indexing information from the request's body. We’re setting up variables to keep track of the total number of videos, the number of processed videos, and a chunk size (set as 5 for this app) for downloading and indexing videos. We also initialize an array to store responses from the video indexing process.
2 - Download videos in chunks
Next step is to proceed to download videos in chunks. For each chunk, it iterates through the video data and uses the ytdl-core library to download videos from the provided URLs. Video titles are sanitized to create safe filenames. The progress of video downloads is logged as they complete.
💡Here, we’re setting the videoPath where downloaded videos to be stored in the ‘videos’ folder.
3 - Submit videos for indexing
After downloading a chunk of videos, it submits these downloaded videos for indexing. We’ll wait for all indexing tasks to complete and log the progress of indexing submissions.
Let’s also take a quick look at the function indexVideo. Indexing video itself is quite straightforward. Similar to other API calls, the process involves initiating the indexing task with a POST request to the Twelve Labs API. This request includes specific parameters; the index_id to specify the target index, the video_file (in this case, the video data streamed from the video path), and the language setting, 'en' for English.
💡Check out the API reference for details in indexing a video (creating a video indexing task)
response.data from this call will return a task Id like below. Each task Id is stored in the indexingResponse as you can see in the previous code snippet.
response.data
On top of the response.data though, we are adding videoData to the indexingResponse as we will need the videoData later to add to each video’s metadata. So each final indexingResponse will look like below and will be concatted to videoIndexingResponses.
videoIndexingResponses
4 - Respond with task ids
Once all videos have been downloaded and submitted for indexing, we’ll respond to the client by providing an object of task IDs (the above array) and an index Id.
Step 3. Update metadata of the videos
In general, this step could be optional but we need it for this app to show the videos with YouTube url and by channel / influencer.
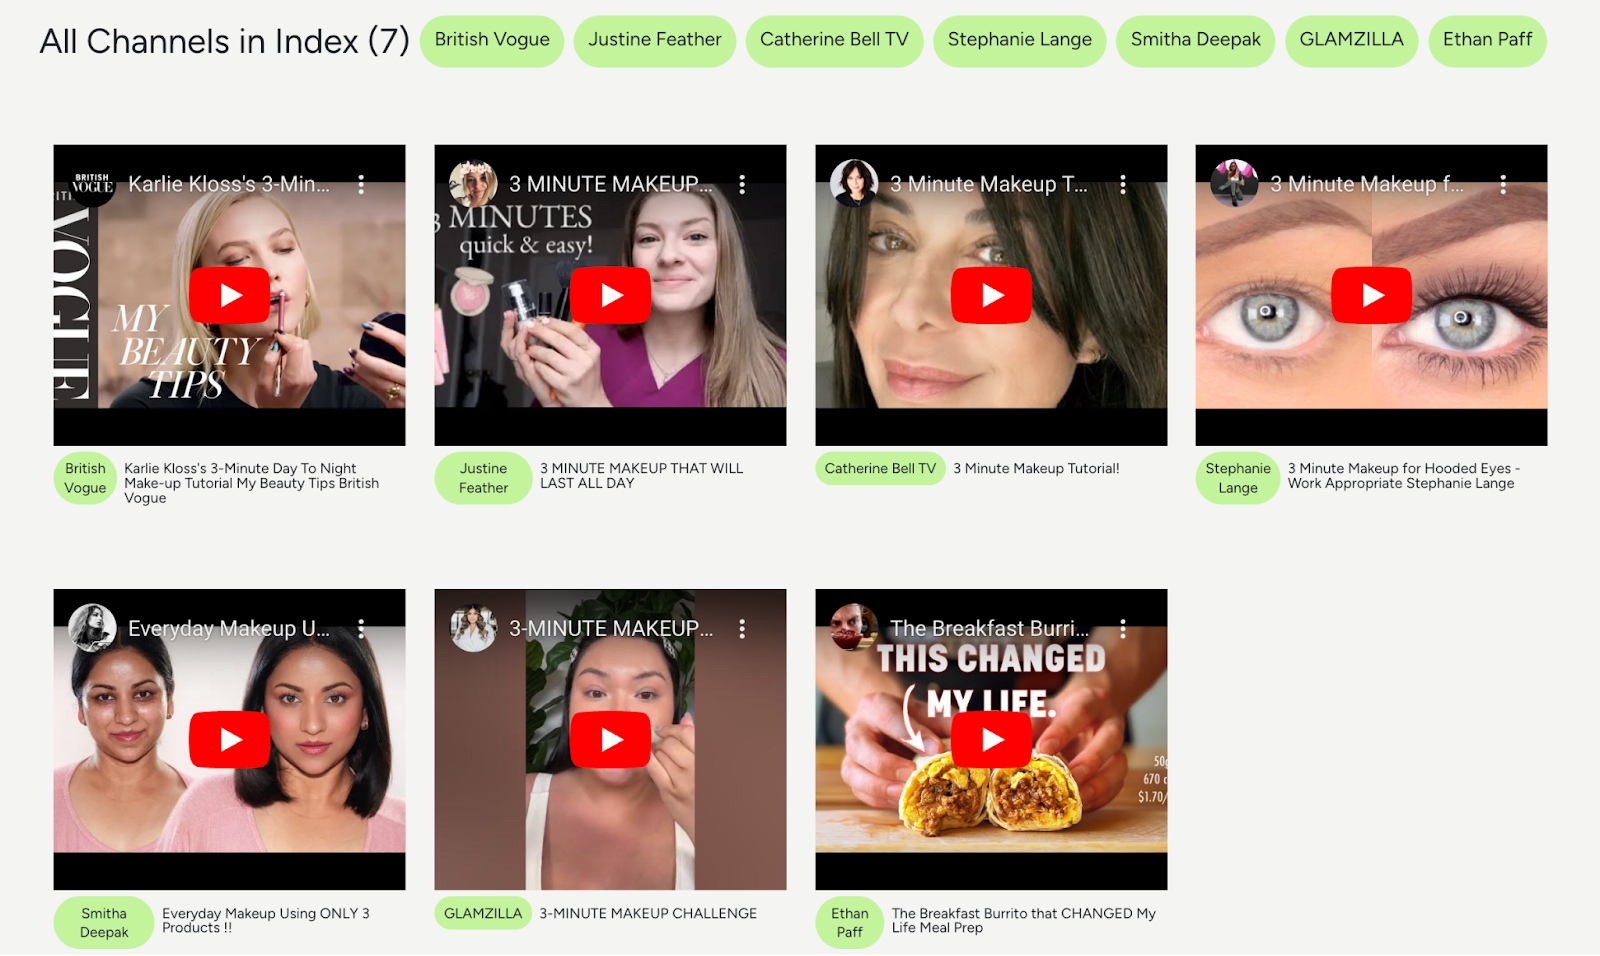
How Videos are Shown in the App
As you can see, the app shows the channel name in a light green pill for each video. The videos are also populated via React Player using Youtube url (vs video url from the Twelve Labs server). As the default metadata of a video does not include the channel name and the youtube url, we’ll need to add this information to each video’s metadata.
Below is an example of the default metadata of a video.
You can add any key-value pair or update the existing metadata. For this app, we are adding three additional data to the metadata: 1) author (channel name), 2) youtube url, and 3) a boolean value of whoTalkedAboutUs - to mark whether the video has been uploaded via the app.
The magic happens in the server.js file, where you'll find an endpoint which handles the video metadata update. Here, you can see a PUT request including the data to add or update is made.
💡Check out the API reference for details in updating video information
Now, let's look at how this is implemented in the UploadYouTubeVideo.js file.
UploadYouTubeVideo.js (line 190 - 223)
The updateMetadata function finds the matching completed task video from all task videos. For each match, it extracts the author's name and YouTube URL and constructs the custom metadata. The value of the whoTalkedAboutUs key is set to true for all videos. Then, it fetches from the server to apply these changes.
💡 Note that the data you provide should be in the form of an object with a 'metadata' key, and this is where you can add or modify the key-value pairs to personalize your video data.
After this process, your video metadata will proudly display the new additions - 'author', 'youtubeUrl', and ‘whoTalkedAboutUs’! Overall, updating metadata is a fantastic way to put a personal stamp on your video collection.
Step 4. Search video
Finally, the moment you've been waiting for - video searching! Now, you can search for videos among your indexed videos within an index.
In this app, pagination has been implemented in showing the search results. Thus, getting and showing search results consists of two parts; getting the initial search result by making a POST request, and fetching the following search result pages by making GET requests with the next page token.
Making a search POST request
To get the initial search results, we need to make a POST request to the search endpoint, located in the server.js file. It takes indexId and query from the request then makes a POST request to ‘/search’ for the TwelveLabs API.
For ‘search_options’, I included all four; ‘visual’, ‘conversation’, ‘text_in_video’, and ‘logo’. I also have applied multiple options like ‘threshold’, ‘sort_option’, and ‘group_by’. With all these options, I am basically filtering the results with the confidence of “medium” and “high”, grouping them by a video, and sorting them by clip counts.
💡Check out the API reference for details in making a search request
With the ‘/search’ endpoint set up, the useGetVideosOfSearchResults comes into play. It is a React Query hook that utilizes ‘search video’ and ‘get video’ functionalities concurrently using React Query hooks. It is imported and executed in SearchReuslts.js then the next page token, search results, and search result videos are extracted from the query response.
SearchResults.js (line 25 - 33)
useGetVideosOfSearchResults function is defined in the apiHooks.js. As mentioned, it uses the useQueries hook to to concurrently execute multiple queries; getting initial search results then getting the information of the matching videos of each initial search result.
You can see the useSearchVideo hook is called first to get the results of a video search.
As a result of the api hook calls, the data we get - initialSearchResults and initialSearchResultVideos - look like below.
initialSearchResults
Each initialSearchResult consists of ‘clips’ that include the search results and an ‘id’ which is the video id of the corresponding search results.
initialSearchResultVideos
initialSearchResultVideos consists of video objects including metadata of the corresponding search results.
Now we have the initial search results and the corresponding videos. However, if there’s a next page token, it means that there are additional search results. This is why I have set up additional states ‘combinedSearchResults’ and ‘combinedSearchResultVideos’ to combine and store all the search results and videos in one place. Especially because this app shows the results grouped by each influencer (YouTube channel), these states are essential to first combine the data, organize it, then present it to the users.
Now, let’s take a look at how to fetch search results for the next pages.
Making a search GET request
Remember we have retrieved the next page token from the initial search data? We can now make a GET request to retrieve the additional search results using the next page token. As long as there is a next page token included in the search results, we should keep making the requests to make sure we’re collecting all the results.
SearchResults.js (line 50 - 53)
fetchNextPageSearchResults calls a GET request to the ‘/search’ endpoint of Twelve Labs API and fetches the data. I have used fetchQuery here as we’re conditionally fetching the data only when a user clicks the button.
Based on the search results, similar to what we did with the initial search results, we’re getting the corresponding video data using fetchNextpageSearchResultVideos. Finally, they will be added to the combinedSearchResults and combinedSearchResultVideos.
Whenever combinedSearchResults and combinedSearchResultVideos change, the results will be re-organized (relevant code here). The organized results will be then rendered through the SearchResult component.
💡 Check out the API guideline for more details on controlling pagination of the search results!
As now we have built the server and api hooks to access all the data we need, we can build components to get, manipulate, and render the data to the users. In the next step, we'll see how all these components come together to create a powerful influencer search application. Stay tuned!
3 - Build container components
When it comes to the parts of building components, starting from the container components makes the process easier as presentation components often rely on the API responses or states from the container components.
💡 If you’re not familiar with the terms container components and presentation components, these are the terms commonly used in the context of React. Container components, also known as smart components, handle the logic and data flow of an application, managing things like data fetching and state management. Presentation components, or dumb components, focus on rendering the user interface and displaying data, receiving their functionality from container components via props.
3.1 - VideoComponent.js
The VideoComponents is a central piece of the application, offering a variety of features including video upload, video search, and display videos and YouTube channels names within the index. Users can easily upload new videos, perform searches, and access a paginated view of their video library. It also allows users to delete indexes when needed. Let’s take a look at how it works.
videoComponents.js (line 21 - 67)
You can see that it is VideoComponents where the query for getting videos and authors are made. It also includes invalidating each query to keep the data up-to-date. The states - searchQuery, finalSearchQuery, isSubmitting - are set here as they are shared with its child components like UploadYouTubeVideo and SearchResults.
Rendering UploadYouTubeVideo
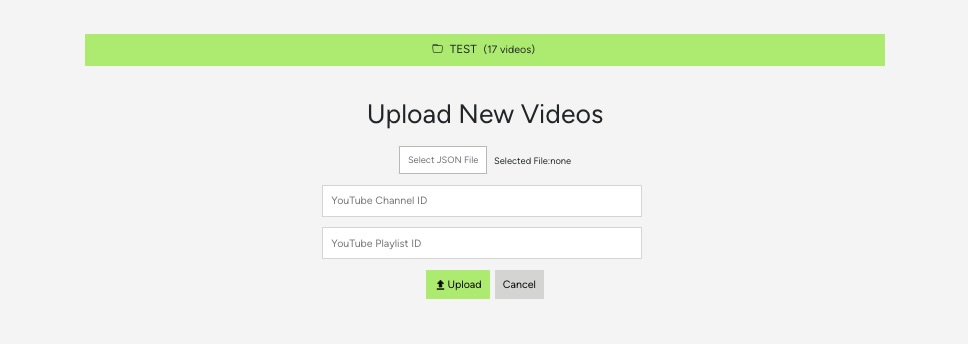
By default, each VideoIndex shows the UploadYouTubeVideo which enables a user to upload videos in bulk by YouTube playlist, YouTube channel, or JSON file consisting of video urls. UploadYouTubeVideo will be covered in more detail later.
videoComponents.js (line 69 - 82)
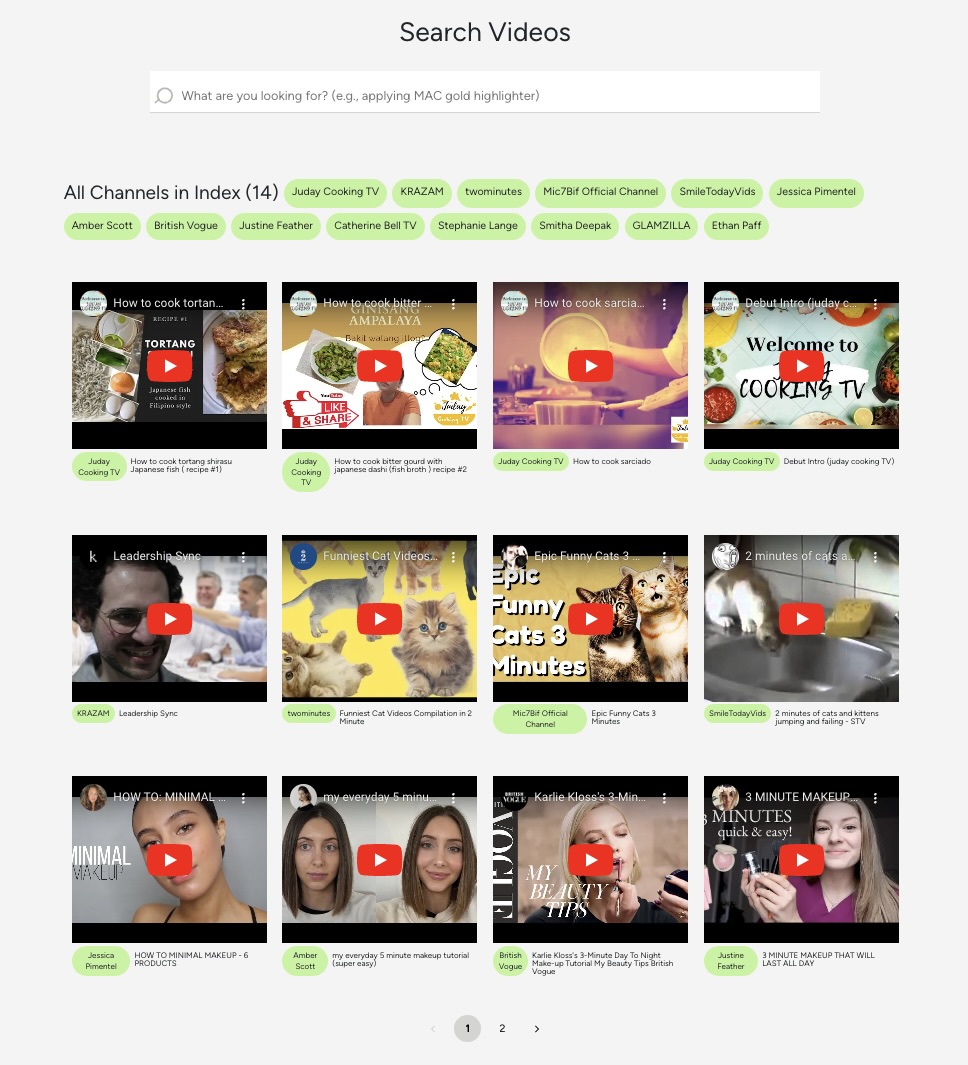
Rendering SearchForm and VideoList
When there are already videos inside an index, in addition to the UploadYoutubeVideo component, the video search form should also show. If there is no finalSearchQuery (which indicates that a video search has not been performed), only the list of videos will show 12 per page, leveraging the PageNav component. VideoList will be covered more in detail shortly.
videoComponents.js (line 97 - 162)
Search Form and Video List
Rendering SearchResults
If there is a finalSearchQuery (a video search has been performed), the search results will be rendered instead of the list of videos.
VideoComponents.js (line 164 - 186)
If interested, check out the details of how the search results are grouped by each YouTube channel. The search result also shows the channels that are not part of the search results, which makes this app unique!
Search Results

3.2 - UploadYoutubeVideo.js
UploadYoutubeVideo is rendered as part of VideoComponents.js and is another major container component responsible for uploading and indexing YouTube videos. It also deals with showing the task video(s) right after a user submits an upload request and showing the progress of each task.
Therefore, it manages several important states, including storing selected JSON files, YouTube Channel and Playlist ids, and task ids which include the indexing status. It provides functions for handling file selection, resetting component states, and making API requests to fetch or index video data. Let’s take a look at indexYouTubeVideos function in detail, one of the component’s core functions.
UploadYoutubeVideo.js (line 155 - 188)
indexYouTubeVideos orchestrates the indexing process for YouTube videos. It initiates the process by displaying a message instructing the user not to refresh the page. It then prepares the video data by mapping task videos' urls, titles, author names, and thumbnails into an object.
Next, it constructs a request payload containing this video data and the index id. It sends a POST request to the download url (we’ve covered this in Step 2. Upload videos by Youtube urls), awaiting a JSON response. The response includes task ids and an index id. Each taskIds and indexId state is updated accordingly.
UploadYouTubeVideo has other sub-components with many states and functions. I will not cover all the details here but feel free to dive deeper into it and let me know if you have any further questions or clarifications!
4 - Build presentation components
Now the hard part is over and we’re finishing up by building the presentation components. The presentation components are the ones that simply render the video players based on the task videos and videos that are passed down from the VideoComponents. In this app, I’d call VideoList and TaskVideo as presentational components. Let’s take a look at the VideoList as an example.
It maps the videos and renders the video player via ReactPlayer and presents the author (influencer) and filename of each video. You can see how it looks in the app at Rendering SearchForm and VideoList section above.
Conclusion
I hope this post has provided you with some insights into Twelve Lab's video search API and its practical application for a specific scenario. Remember, this is just one of many potential use cases and you have the freedom to create solutions that work for you and your team. Happy Hacking!
What's Next?
- Check out the Quickstart tutorial, and begin building amazing apps with Twelve Labs.
- Try out our Playground. Default video credits are 10 hours.
- Follow us on X (Twitter) and LinkedIn.
- Join our Discord community to connect with fellow users and developers.
Generation Examples
Comparison against existing models
Related articles

"Generate titles and hashtags" app can whip up a snazzy topic, a catchy title, and some trending hashtags for any video you fancy.
A Twelve Labs and MindsDB Tutorial


This blog post introduces Marengo-2.6, a new state-of-the-art multimodal embedding model capable of performing any-to-any search tasks.


"Summarize a Youtube Video" app gets your back when you need a speedy text summary of any video in your sights.